Clay Paint Recipe for Cobbed Wood Stove


cobclaypaint20192

Its Winter 2019 and after years of happily living life in the yurt (built and moved in 2012!!) homesteading, mushrooms learning and healing through farming – I am renewed and inspired to share this clay paint recipe from A Year Of Mud:

  • 1 part screened clay
  • (1 part fine sand) i did not add sand
  • 1 part wheat paste


Want to see how we build this cob stove? See how we cobbed the woodstove with the help of oli. But I made way more than I need when I followed a year of mud recipe.

SO this time around I will be making just enough for 1 stove so read below for my recipe proportions:

1.Wheat Paste Recipe for Cobbed Wood Stove.

  • Boil 1/3 Cup water
  • Meanwhile…
  • Stir 1/8 Cup White Flour
  • + 1/6 Cup Cold Water
  • Then…
  • Add Paste to Boiling water and stir over/medium heat while it thickens. Cool.

2. Mix in equal part Clay

3. Add metal oxides for color


cobclaypaint2019

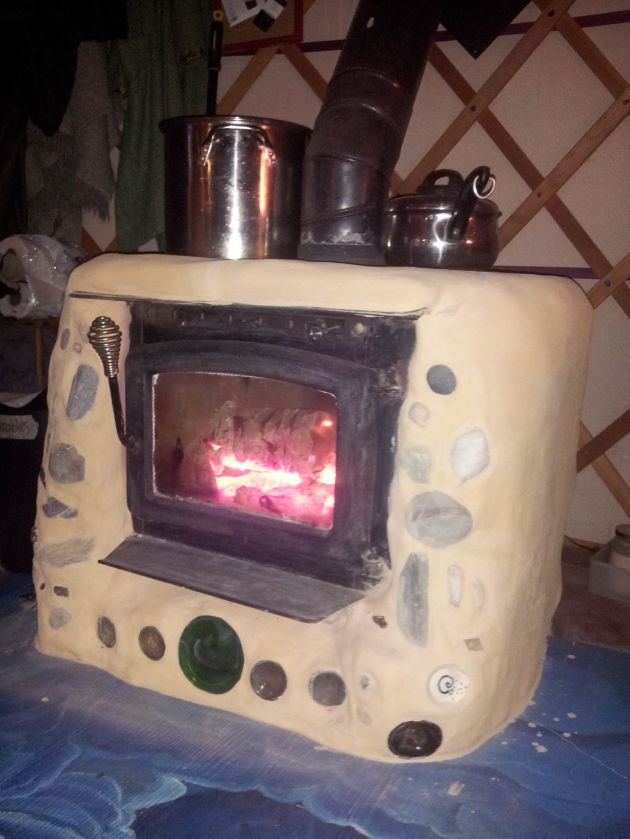
clay paint on cob stove with metal oxides


The following is for your reference but mostly for my own so i can understand the recipe for future projects. Enjoy!

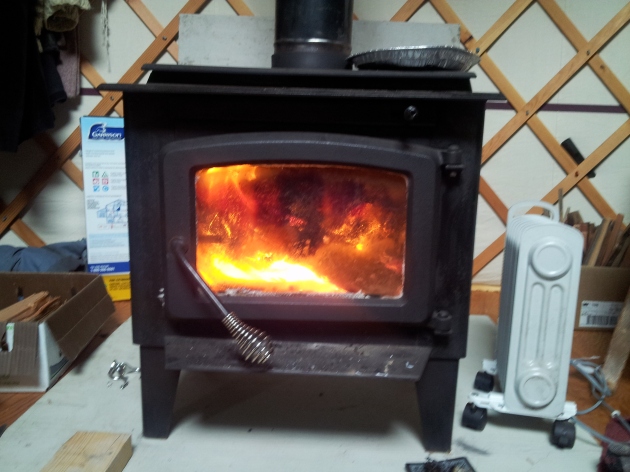
SO why am I repainting? Its time to repaint since the paint fro 2 year ago is looking shabby and its chipped and some black stains have appeared from the fire.

A Year of Mud’s recipe above calls for 7 cups of wheat mash alone. So if with equal parts that would make 7 cups wheat paste, 7 cups sand, (but i dont want sand), 7 cups clay = 21 cups!

“Bring 4 cups of water to a boil. While water heats up, add 1 cup white flour to 2 cups cold water. Stir well to remove chunks. Once 4 cups of water comes to a boil, add water & flour mixture, and stir well. Continue to stir over low/medium heat while the mixture thickens, and be careful not to burn the bottom. Once the liquid is thickened, remove from heat.”

SO rather than 21 cups I think I only want 3 cups total paint so ill only need  approximately 1/7th of the above recipe and thats how i came up with the proportions above!

Are you painting your cob stove? Let me know how its going!

Happy Cobbing,

Sarah Louise


cobbing the stove, making the yurt even more cozy

Yes we still live in the yurt! Its technically late summer/early fall and we are not near lighting a fire but im reminiscing about winter since the turn of seasons can be gloomy here. Nevertheless we’re up and out of bed because fall harvest is upon us and we’re looking forward to our 4th winter in the yurt coming up. Life before cob…

wp-1382220672992


People who live in conventional houses walk in the yurt in the summer… and often ask.. is it cold in the winter?

but those that come in the winter, dont ask that… they say wow its surprisingly soooo cozy!

its warm and cozy, come on over…

We keep a big pot of water on the stove to do dishes with. Before bed wed notice it was pipping hot. By morning though it was warm or cold.

Year two we experimented with a cob bench picture below:

(the sun star reminds us: “its always sunny above the clouds”)
20150304_100647

Cob bench was warm to sit on or dry your socks. But with our friends all being into cob structures Jed thought… can we do more cob? can we make the yurt even more heat efficient? aka cozy.

So even though

  • winters can be -20 degrees Celcius (-4 F) for weeks of the season we’ve never gotten up in the night to stoke the fire – feeling blessed!
  • in the last 3 winters we’ve only burned just a few cords of wood – wow.
  • = this is surely due to our 6” of wall wool, 6” of floor insulation, and 6” of roof styrofoam.


So last fall using sand from the sand hill, clay donated to us by a lovely artist who stopped firing with #10 clay, and … straw to bind it all together (oli calls it rebar!) the stove got cobbed with the help and guidance of cob house building friends!

then painted with  yellow and red iron oxide, clay and flour and yes, cattail fluff (binder). More colour will be added one day. There are some large cracks that could not be filled, even though it tried several times. They occur where the flange meets the main body and thats where there is the most cold/hot contrast, hence the cracking from contracting. This could have been avoided if we’d made spacers and/or included metal mesh.

20151220_100821

Post cob building.. when we light a small fire in the winter evenings it takes about 20 minutes longer to warm the room up but the heat it retained longer… the cob warms up and stay warm till morning.

The best part is this…. we get up  in the morning and rather than the water in the pot on the stove be cold… is still HOT ! very very cool.

cobstove


Cob it up!


Fall blessings to you,

sarah


Changing the World with “The Yurt is Born”

This post comes from Sarah’s new england permaculture life blog. Sarah came up with the title and its bold! Most days I feel like my life makes little changes but really those “little changes” affect me greatly, my community and do ripple out and affect the whole – so its true we are all and always affecting the whole world.

Last year she talked to us about the yurt project. about the little changes that matter. and about the journey. awwwh, Thanks Sarah for asking your thoughtful questions 🙂

Building a New England Homestead

This edition of changing the world comes from the blog “The Yurt is Born.”  Be sure to check out her blog!

I found you through your blog. What is your blog and/or project about?

“Jedidiah Wiebe and I (Sarah Lecouffe Axtell) started the Yurt is Born blog as a means of sharing the building process with those interested in making a beautiful, hand built yurt made from mostly pre-loved materials for just 4000$. The blog was also there so my mom could watch : )

While we learned a lot from others the blog is also about documenting and sharing a bit of the stuff we couldn’t find answer to. Such an answer we learned through experience was… how can we make affordable sheep’s wool insulation that is effective at (-20C/-4F)? Our blog answers that.”

I believe that you are someone who is helping to change the world…

View original post 670 more words

Low tech living, looking forward not backwards. Wear wool Socks!

To shower or not to shower. Well thats not the question for most folks unless you choose the “radical” option for reducing energy usage in bathing which is described in the LOW-TECH LIVING AS A ‘DEMAND-SIDE’ RESPONSE TO CLIMATE CHANGE AND PEAK OIL SIMPLICITY IS THE ULTIMATE SOPHISTICATION by Samuel Alexander and Paul Yacoumis Simplicity Institute Report 15d, 2015.

In case you were wondering what the other options were, the authors come up with just five ways to bath more simply:

P. 8 The reference scenario yielded a result of 21,199 litres of water and 851 kWh of energy consumed by our two-person household annually. Five alternative scenarios are described as follows:

• Moderate 1: Reducing shower time to 3 minutes with no use of a solar shower.

• Moderate 2: Using a solar shower, when possible, but showering regularly otherwise.

• Strong 1: Using a solar shower, when possible, and reducing shower time to 3 minutes otherwise.

• Strong 2: Using a solar shower, when possible, otherwise reducing shower time to 3 minutes, and reducing shower frequency by one-third (equivalent of showering around 4 times per week).

• Radical: Using a solar shower, when possible, otherwise reducing shower time to 3 minutes, and reducing shower frequency by two-thirds (equivalent of showering around 2 times per week).

And the results in reduction of energy usage are astounding! See page 8

Woo we’re Radical! That means that “Under the ‘radical’ scenario our two-person household is saving over 17,000 litres of water per year, and reducing shower-related energy consumption by nearly 90%.”(Alexander and Yacoumis, 9). But thats compared to conventional peoples showering habits. Like many days this summer we have been jumping in the cold creek – several times a day.  I shower 1-2x/week in the neighbours house. and in the winter probably 4 x/week. But enough about my excellent hiegene! The article caught my attention because it seeks to focus not on the  big bad problem side of the earths destruction – industry, governemnt etc – but it seeks to look at the demand side from a practical viewpoint.The authors don’t just examine homee water usage they look at heating, cooling, driving, toilets and more. The demand side is US! What would it actually look like to use simple low input technologies that are readily available to us  like the sun heating up our water! This is something which Jeds parents have done for the past 25 years  with a solar preheat tank – woooh.  But also what would that mean if this low-tech living practices/lifestyles were adopted widely?  I know you’re wondering… would it REALLY make a difference? Im interested. Im stocked to see that someone is crunching the numbers and what they find out is cool. Read on here…

For an overview of the article the abstract says it better than me:

 Energy is often called the ‘lifeblood’ of civilisation, yet the overconsumption of fossil energy lies at the heart of two of the greatest challenges facing humanity today: climate change and peak oil. While transitioning to renewable energy systems is an essential ‘supply side’ strategy in response to climate change and peak oil, the extent of the problems and the speed at which decarbonisation must occur means that there must also be a ‘demand side’ response. This means consuming much less energy not just ‘greening’ supply, at least in the most developed regions of the world. In that context, this paper provides an energy analysis of various ‘low tech’ options – such as solar shower bags, solar ovens, washing lines, and cycling – and considers the extent to which these types of ‘simple living’ practices could reduce energy consumption if widely embraced. We demonstrate that low-tech options provide a very promising means of significantly reducing energy (and water) consumption.

Are you practising moderate, strong or radical living? How do you do it? Do you like your lifestyle? What changes would/could you make and share with us?

And remember, you too can be radical just by wearing wool socks in the cold northern winters.

Making a Dome shade/screen

When it gets hot (30c+) you make a shade cover and when the mosquitos come in you make a screen. Put the two needs together and shazam! You’ve got a burlap sack thing.

yurt shade cover and mosquito net up close

We bought a 24′ by 3′ roll of burlap cloth which makes about a two layered 8′ by 8.5′ piece. We think it keeps the bugs out (some must get in through the door though) and the two layers sewn together (on a sewing machine woooh!) block some sun from entering the yurt.

Cooking on the outdoor kitchen or fire pit is also essential for keeping the yurt cool these days.

Since the dome opens and closes some 18'' we needed the material to be able to "stretch" but also not leave gaps where mosquitos could get in. Burlap is the way to go. When is deteriorates we can compost it!

Since the dome opens and closes some 18” we needed the material to be able to “stretch” but also not leave gaps where mosquitos could get in. Burlap is the way to go. When is deteriorates we can compost it!

A plant acting as a weight for one of the corners of the yurt shade cover/mosquito net

A plant acting as a weight for one of the corners of the yurt shade cover/mosquito net. In the photo above you can see a pink bottle (near the chair) hanging from another corner of the burlap cover.